Figuring Out the Size of the Boat
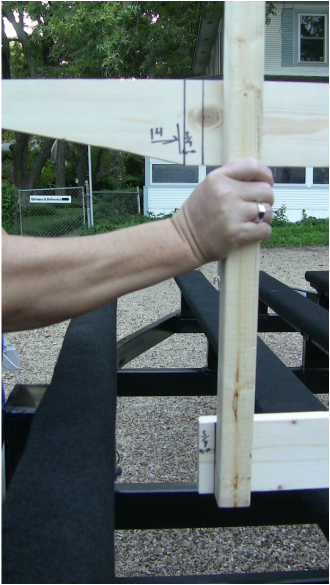
By using the new trailer to determine the size restrictions, the distance between the guide-on bunks is 71". That is 4" inches less than the plans. Not that hard to change. I just took 2" off the aft hull spacer (was 3" now 1") and took 4" off the foreward hull spacer (was 21" now 17".) Trying to keep the hull curves the same. After checking the distance from the guide-on bunk to the outside of the wheel well, gave me about 14". Since I do not want the deck to extend out too far, I chose this figure as the deck extention measurement. This will make the deck extend 6.5" more than the plans, which will allow someone to actually manuver on the side decks. So the final deck width will be 8'3". From the winch to the end of the bunks is a little more than 15'. At first I was going to have the deck extend over the winch, but I figured I might appreciate some room to be able to turn the handle. Therefore I decided to not extend the deck over the winch. So from the back of the cabin to the fore of the boat will be 15'. Since I enlarged the heigth of the hull 8", this will also increase the diameter of the paddle wheel by 16". So I decided to round the measurement of the aft to 40". This makes the over all length of the hull to be 17' 2" and the width to be 5' 11".
HULL PLAN
Here is my first draft of the boat's hull dimensions. I kept the curves the same. In fact all I did was reduce the width by 4" and adjust the cabin's braces to be 25" apart. I also inserted an extra 25" section, thus moving the deck's curved foreward portion out of the cabin area entirely. I also extended the aft by a little more than 8", rounding if off to 40". This turned out to be wrong. After drawing a full scale of S-2, I discovered that to keep the same curve, and to have that curve begin at Bulkhead B-2, then I had to make the piece longer. I ended up making it 49". I was lucky that with a little tweeking I got the bow bottom curve to begin at the same place as the bow side curve. These now begin just before the cabin. If you build the original plans, the bow side curve begins inside the cabin, making it a little interesting to make a square cabin. Once again, after widening the trailer, I redrew the hull and made the final measurements...see drawing under BOAT PLANS.
To determine the correct size of S-1, I laid out the basic hull plan on my floor. I then made the curves using thin scap wood. I use the scap wood in the same way when I draw my curves for cutting. This way it gives you an nice clean curve. Of course it is easier to use clamp instead of tape. I think my wife was worried when I started laying down the tape last night. She asked if I was planning to use the hard wood floor as part of my boat.Truth be told, it would look nice on my boat. The entire side length was 18'2", just three feet longer than the original. Again, after finding that the required length of the S-1 aft curve was 51", I then found out that I needed the aft to be 49", making the hull to be even larger. (Four weeks later, and my wife is still pointing out the tape residue on the floor.)
I want the same curves for the bottom of the boat also. Here I drew out the original side curve, then extended it up 8" more.
Width of Hull Revisited
Ok, after talking with Marcus, I have decided to subtract another 2 inches. This will now give the boat some clearance to the guide-ons. Which makes the side decking to be 15" wide. Why lose the inch on top, it is only the hull that needs to be thinner.

Here I am, making a full size hull drawing. I am using the thin wood to be able to make a nice curve. Last time I had a hard time trying to just clamp the thin wood. This time I clamped a solid piece down and then clamped the thin to that. Much easier, believe me.

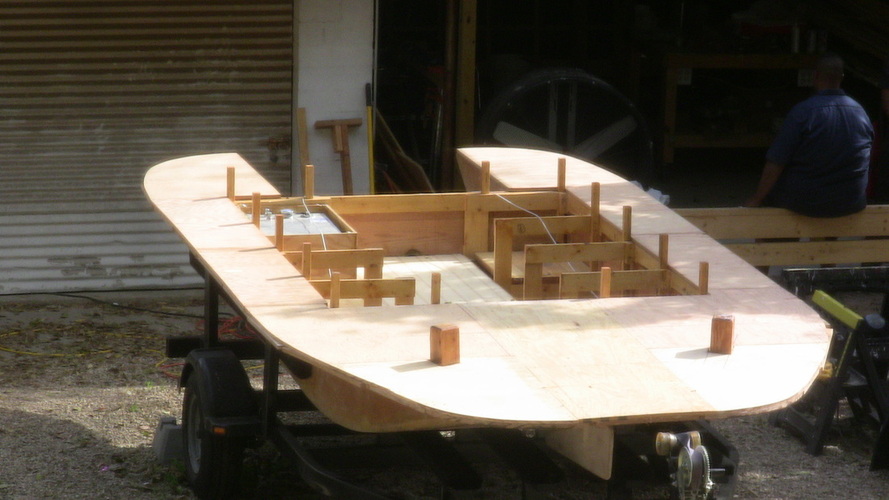
Ok, here the paddle wheel is drawn in. I used 5 pieces of 4x8 plywood. This means that the entire boat with extended deck and paddle wheel will most likely be a little less that 20' total.This will keep the boat as a class 1, any boat between 16' and 26', which determines the type of safety equipement required on board. I tweeked the drawing again, and added a 2" separation at the aft end. This kept the curve nice looking and once again the length was moved back to 50". I had to make sure the side curve still measured 51". I believe I will tweek the fore end also, because I am remembering that the width determines the size of the gangplank, and the wider it is the easier to use.
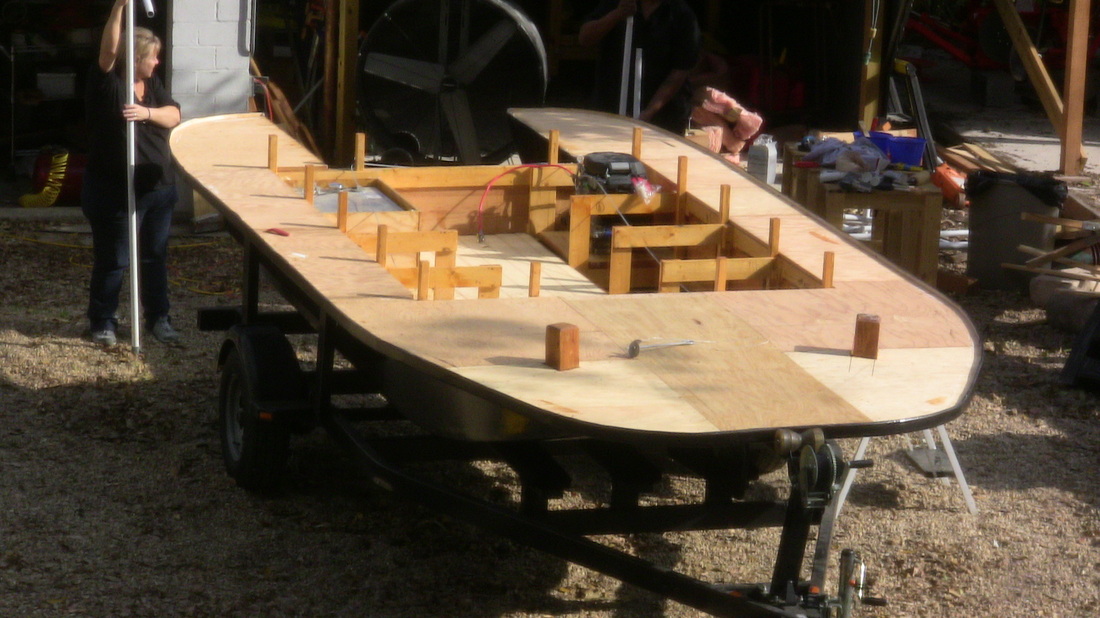
Here is my wife, Theresa, holding the first completed frame. You can see how much clearance the boats deck supports have above the guide-on bunks. I decided to use 1"x4"s instead of the 1"x2"s the plan called for. While I was shoping for wood, I noticed how nice the 1"x4"s wood was, and decided to go for that instead of the rough cut wood I used last time. This will also let me place some styrofoam sheats between cabin deck and the bottom of the boat (in case of a swamped boat, this will hopefully help it to stay on the surface instead of diving for the bottom of the lake.)
After looking at the trailer's guide-ons, I decided to cut them off and move them to the outter edge of the trailer frame. This gave me 7" , so I was able to return the stolen 4" back to the boat's hull. It also lowered the guide-ons giving me more space between the deck and the guide-on bunker.
After looking at the trailer's guide-ons, I decided to cut them off and move them to the outter edge of the trailer frame. This gave me 7" , so I was able to return the stolen 4" back to the boat's hull. It also lowered the guide-ons giving me more space between the deck and the guide-on bunker.
I'm planning on placing chines and battens on the frame to help support and strength the boat's sides and bottom. These are thin pieces of wood running fore to aft of the boat attached to the ouside of the frames. I plan on placing the side battens on the outside of the 1 1/4" frame riser, and notching the bottom frame board for the ones running along the bottom of the boat. You can see how much room I have from the frame to the guide-ons, this is the total clearance before the sides are put on.

Here I got 6 out of 7 frames built. I have decided to put chines (boards placed at the edges of the sides and bottom to allowing more surface area to be screwed and glued to), and battens (boards that are used to stiffen and strength the bottom of the boat.) These will help to ensure the boat is aligned properly as well as giving the boat a stronger frame.
Since I used in-door plywood (scrap I had laying around), the table is warping, therefore I plan to dissassemble the table and make a level work frame to build the boat on. I notched frame 6 to give more clearance for the gas tank. I also decided to add another page to hold all my drawings, this will be easier to alter them if they are all in the same place.
Since I used in-door plywood (scrap I had laying around), the table is warping, therefore I plan to dissassemble the table and make a level work frame to build the boat on. I notched frame 6 to give more clearance for the gas tank. I also decided to add another page to hold all my drawings, this will be easier to alter them if they are all in the same place.

Here is the finished Building Frame. I made my sawhorses legs shorter, so it will be easier to work on the bottom (of course that is the boat will be upside down, so the bottom will be up.) I made the main support out of L Girders (made from 2"x4" and a 2"x6") and some risers to help level it. I also placed cross boards to make sure the beams don't move.
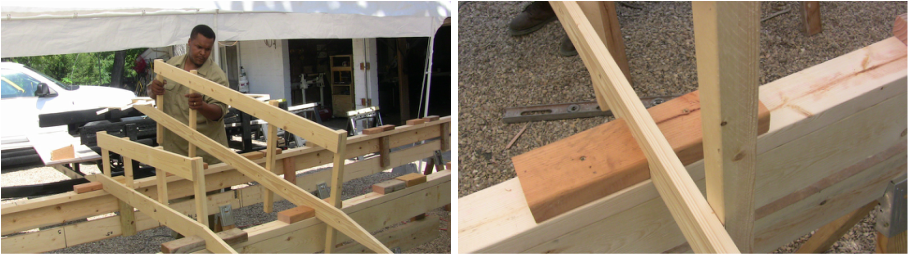
Here is Marcus placing the frames on the Frame Support. Notice the small blocks of wood used to keep the frames immobile and upright.

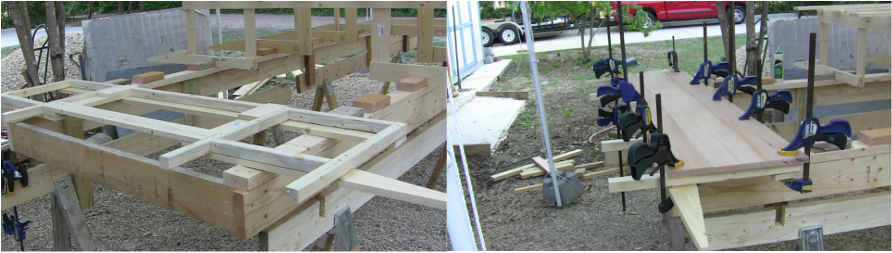
With all the frames on the frame support, and aligned with the chines and battens clamped in place, it is nice to know that the boat's bottom is all level. (It took me two days to come up with this last version of the Frame Support. I was so frustrated at building it and finding the boards I had on hand were all bowed. Make sure to get straight ones first and build the L-Girder first.)

I could not find a piece of oak 18" wide for bulkhead B2 (the tansom), so I laminated one together. Before gluing the Tansom to frame 7, I decided it needed more than just the four 1 1/4" to be glued to and eventually screwed on. So I filled in the voids, to give all edges something to be attachted to.
Here it a few shots of before and after being glued together. I made it so the battens will butt up against the back of the tansom. This will allow the boat's bottom to rest on both of the tops of the batten and the top of the tansom (well bottom actually.) I had off-set the inner frame risers so they will rest on the bottom of the boat, but the rest of the frame will sit on the battens. Looking back the frame did not really need to be offset, but it did help the alignment.
ORDERING FIBERGLASS
I decided to get my fiberglass supplies from Glen-L http://www.glen-l.com/. They have many boats designs, blogs, and supplies. I plan on using micro-spheres and resin to fill in any gaps or imperfections. Then lay a layer of fiberglass down, and then two coats of resin. I bought a few books and DVDs from them on how to fiberglass. DVDs are worth watching.
The site states: Fiberglass sheathing application (includes all coats): 50 to 60 square feet per gallon.
At the time I write this: Poly-shield #3 kit - Slow (make 6 gallons) $578.90
And then I saw this statement :
"The materials I receive from you are the best.and Poxy-Shield's a miracle. I don't know what I would do without it. So far, I've used about 60 gallons since beginning my 51 foot boat in 2004!" Regards, Larry Wegeman - Sunrise Beach, TX
My wallet and I freaked out. So I got back on autoCad and figured out my boat's area and came up with 136 square feet. Great! One 5 gallon can of resin, plus the one gallon of hardener will definately do the job of the hull and the deck.
Placed order for fiberglass tape (two different sizes, so can layer on seams), fiberglass sheets (50" x yards), resin and slow hardener, and those hopefully so handy microshperes.
It takes moer resin to fill the fiberglass sheet mesh , than to give the boat a resin coat.
Resin used so far:
5 gal on outter hull
5 gal on inner hull, underside of deck
Total 10 gal = $1157.80
5 gal on inner hull, underside of deck
Total 10 gal = $1157.80

Tansom is all glued on and frame 7 is now in position. I need to move the blocks supporting the rear of the panel to uncover the guide notches that stern S-2 side fits in.
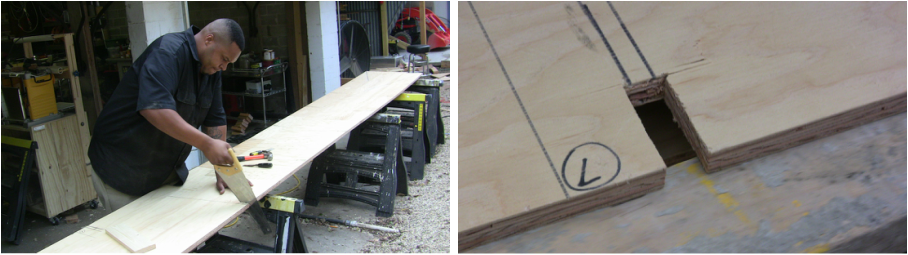
Making an 18" Side Plank

I had purchased some 3/4" marine grade plywood. They cost about $98 each for a 4'x8'. They had some closeout pieces so I bought some of those also. Well, I wish I had bought a few more, for when I started figuring out the cuts needed for the sides, it came about that I needed two 18"x50" pieces. Since I am using plywood for the sides (hard to find 18" solid boards), I have to splice the 8 footers together, with a 50" mid-piece to keep the splices between the frames. This will allow me to have butt boards to splice the boards together. Unfortuantly I did not have enough wood, so I had to make twice as many 18"x25" pieces plus an extra splice. The fore piece is 81 3/4" while the aft is 84 1/4". This with a 50" piece in the middle allows the splices to fit perfectly between the frames 3&4 and 5&6. Of course I have to have an extra splice between frames 4&5. (It was not untill much later that I descovered I did not need to have the splice exatly in center between the frames. The butt pieces fits nicely under the chines.)
Splicing the Plywood
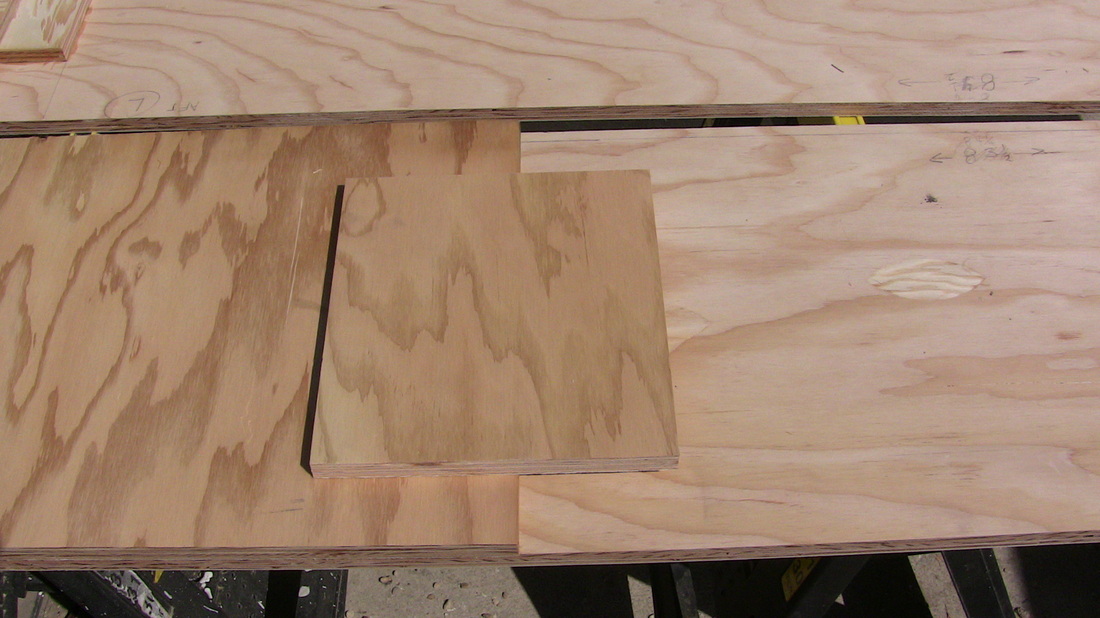
When using a butt plate to join two pieces of plywood, the rule is 1:15 (the overlap length is equal to 15 times the thickness of the board.) So I'm using 3/4" marine grade plywood (last time I used regular plywood, maybe if I used fiberglass it would not have separated on me, but the marine grade is made of water proof glues), so that comes to 11 1/4". So I rounded up to 12", with 6" to each side of the split. Since I want the butt plate to fit between the chines, I made sure to leave 1/4" extra clearance. (In hind sight, I should have given at least 1/2" clearance.) After the glue dries, I will also secure the butt plate with screws from the outside Make sure to make the screws flush and not dug in. If you dig in the screw below the surface, then the screw really only has the few layers it did not tear through to hold and not the entire thickness of the board. Marcus likes to hide the screw heads into the wood, so I will have to warn him to make them only flush.

Here I used an electric drill to place the screws most of the way in, and used the old hand held screwdriver to finish them flush. With the screwdriver I have more control, with the electric drill, it seemed about half of them were sunk in too much. I had Marcus use a hand saw to cut the notches for the tansom, it took him a bit to figure out how to use it. He was so used to an electric saw, he was not sure how to use the hand one. Once he began, he quickly had nice square notches made, he just knocked out the scrap with a chissel, after cutting the initial long cuts. When knocking out notches on plywood, make sure to score with your chisle both sides, to prevent the thin top layer from splitting underneath.
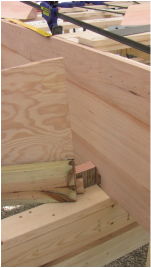
You can see the little notch, that the S-2 bulkhead slides into. The extra board attactched to the top is to strengthen the bulkhead to prevent bending. The original plans required an oak block at the end, well this board will serve the same purpose and help keep the bulkhead straight as well. Since I used the marine plywood to cut the S-2 piece, I decided it probably needed the extra support to prevent bending.
Here is S-2 Bulkhead slid into the knotch in the tansom. I placed a board along the top of the bulkhead to help prevent it from bending when we bend the sides. Also you can see the 3" wedge glued and screwed into the corner. Make sure to always verify the boat is square.

I was able to cut the curves using the hand circular saw. Just cut off the excess leaving a small safety margin from the drawn line. Then after you have about 1/4" left, slowly cut along the line, the wood scrap should be thin enough to allow the circular saw to follow the line without binding.

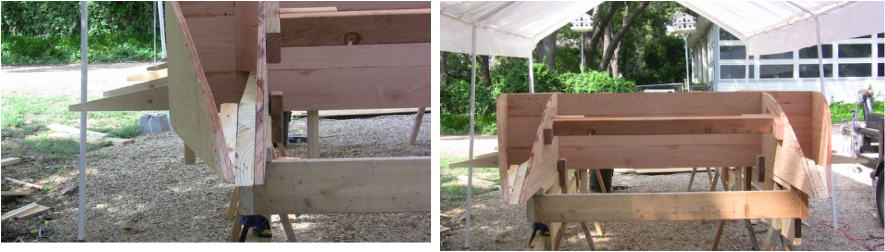
I decided to alter the support frame supports a bit. I took one of the holding blocks away and screwed the frame directly to the other to prevent the frames from moving when I bend the side piece on to the side of the boat.

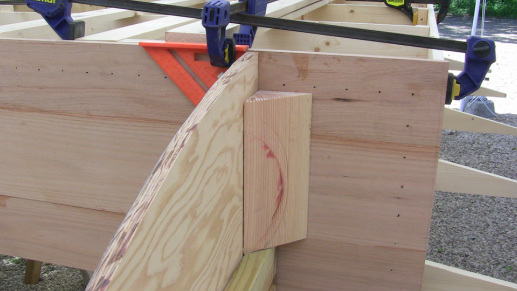
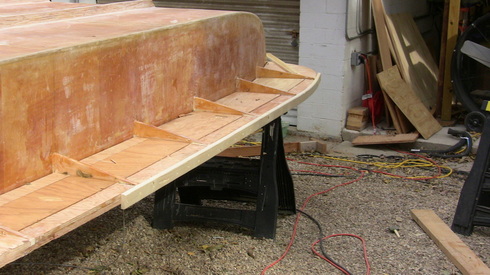
Here you can see how I glued on the chines to help allow the side piece more surface area to be attatched to. I had to add little blocks to help support the chines between the extended deck supports. The side piece will be notched to go under the extended deck supports, butting up against the chines both top and bottom.

See how nice and squared the cabin area is. By securing the frames to the frame support, I can bend the bottom chine and the boat frames do not move. The bottom chine will have to be cut along the curve of the boats bottom. I have read that the chine should not end at the frame but extend a little beyond it if you can.
Marcus is cutting the notches in the sides. Make sure to make them a little bigger than needed. I plan on using the micro-spheres and resin to fill in any cracks or voids.
Here is a picture of one side on the boat. Notice the screws only are along the top and bottom. To place screws along the frame will cause stress when you bend the plywood and will most likely split there. I made sure to place the splices between the frames, and also along the flat part of the side. Splicing tends to prevent the plywood from bending at the spliced location, so it is wise to place splice where there is not supposed to be any bending.

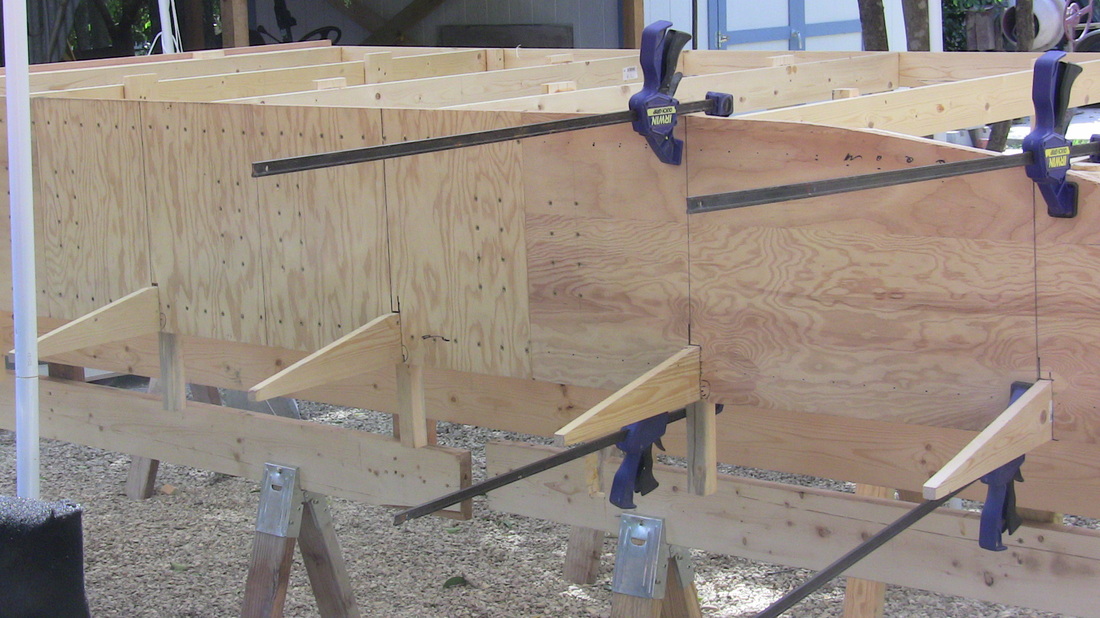
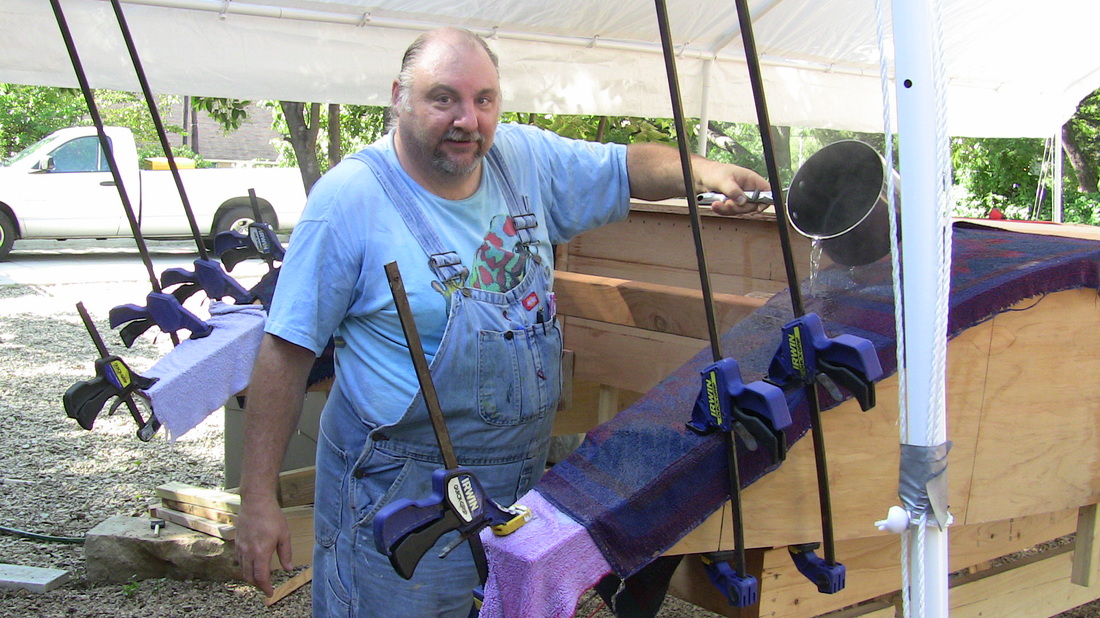
Here we used the hot towel method to steam the plywood into a curve. Just keep pouring hot water on the towels to keep the boards steaming, and then slowly tighten the clamps.
We used a brace to keep the inner boards from bending. I thought the 2"x4" along the inner board would keep it from bending, but apparently it needed the extra support. Once the bottom is fastened, I believe we can remove the support board, so we can fiberglass. Also you may notice that I will have to trim the outter side board's curve to match the inner side board's curve. I plan on using a flash light to creat a shadow and then tracing the shadow on the inside of the outter board.
Cutting a wedge to fit the angles takes time, but well worth it. Here you see the wedge in place and the outter and inner side boards secured together. It is important to make sure the outter side boards are bent straight up and down with no twisting.
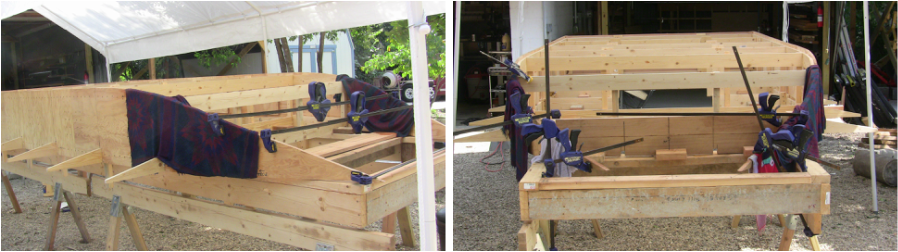
Bending the front is a lot harder. A lot more steaming and more clamps are required. I was not able to get the front to bend all in one day, so am going to let the front rest over night and see if can finish bending tomorrow. It is almost there, but wants to twist. Also I ran out of propane, so no more boiling water.
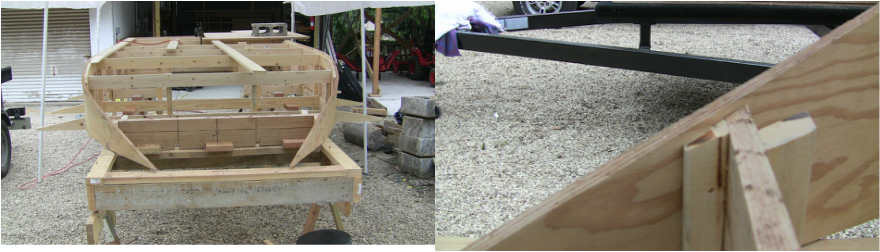
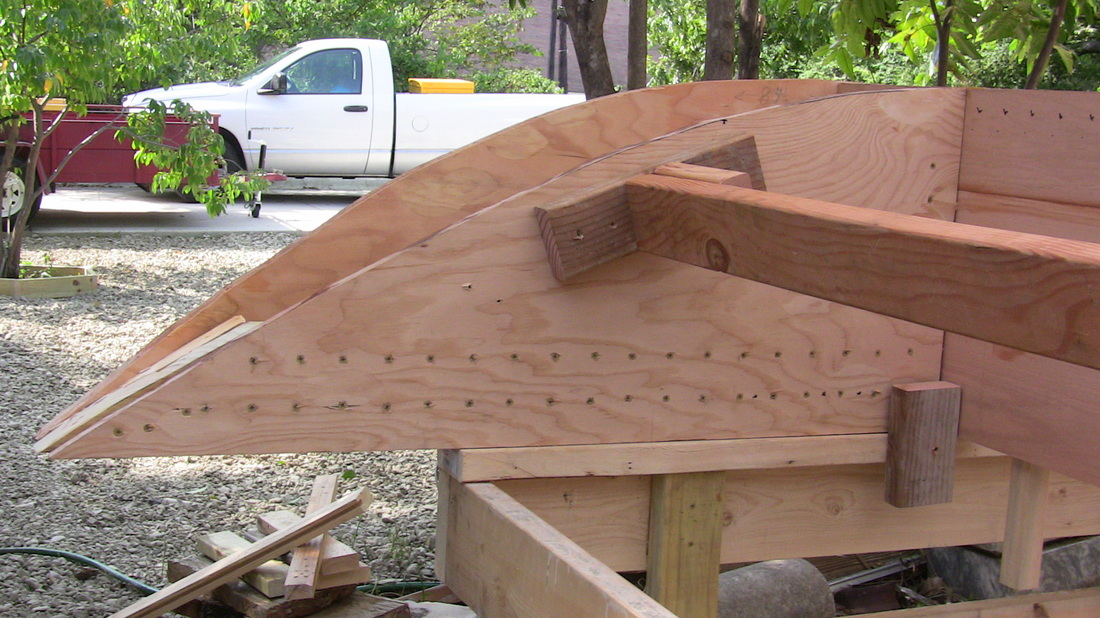
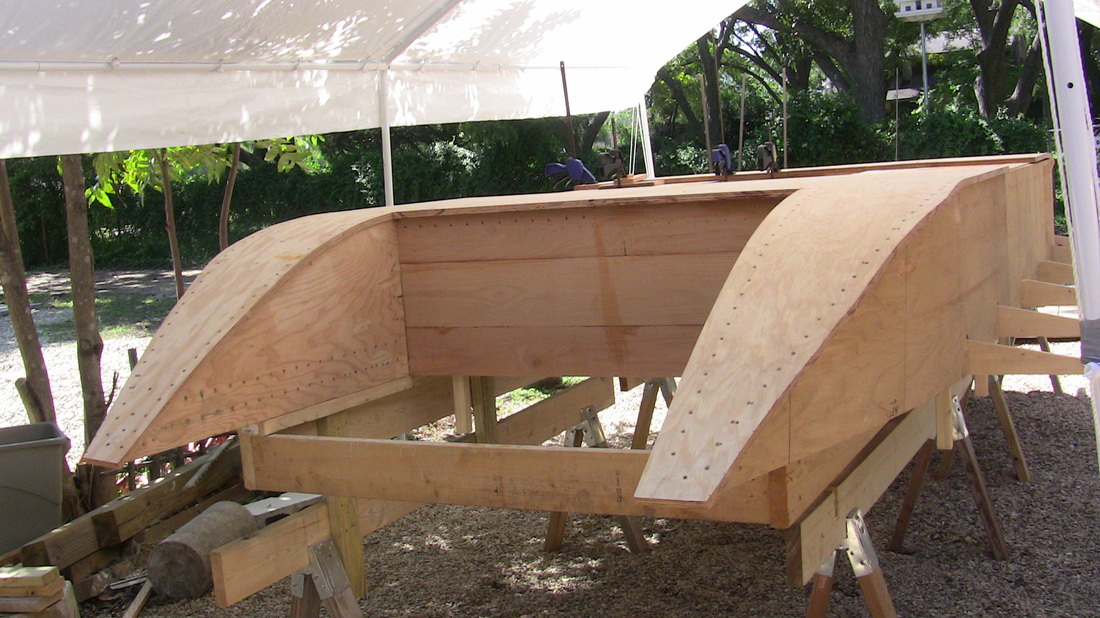
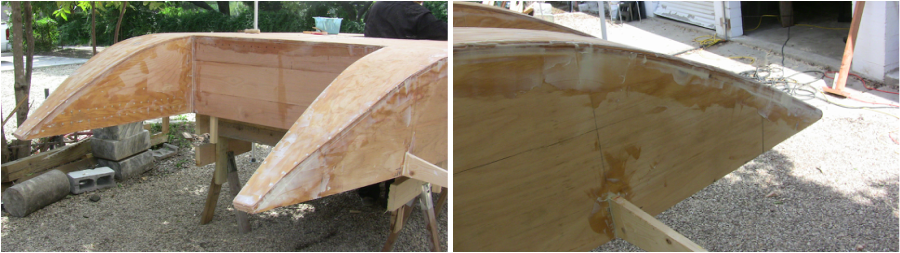
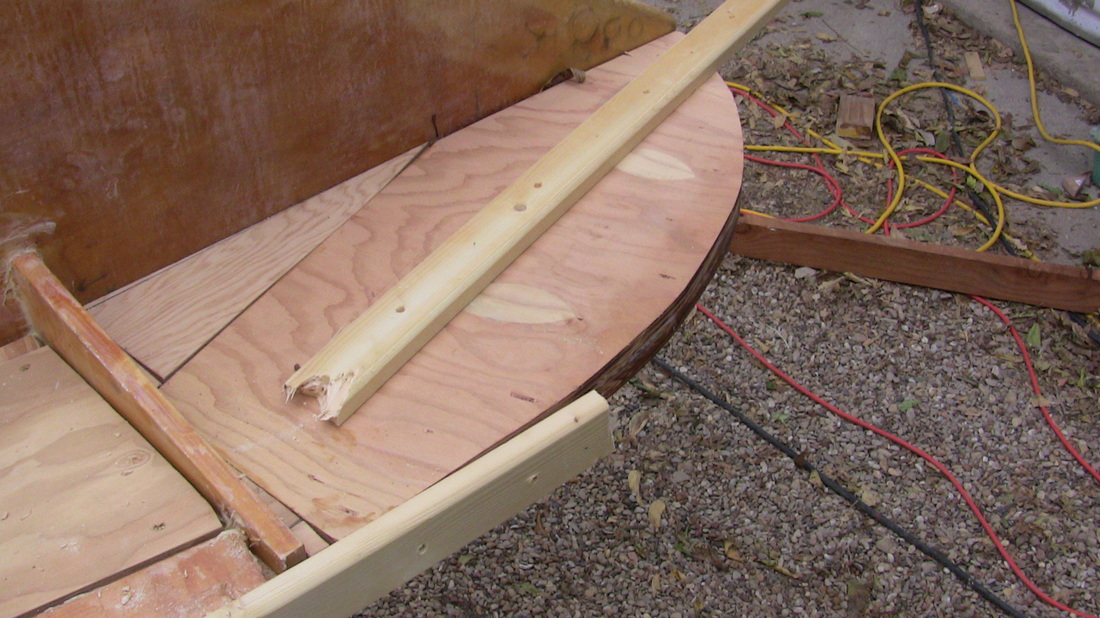
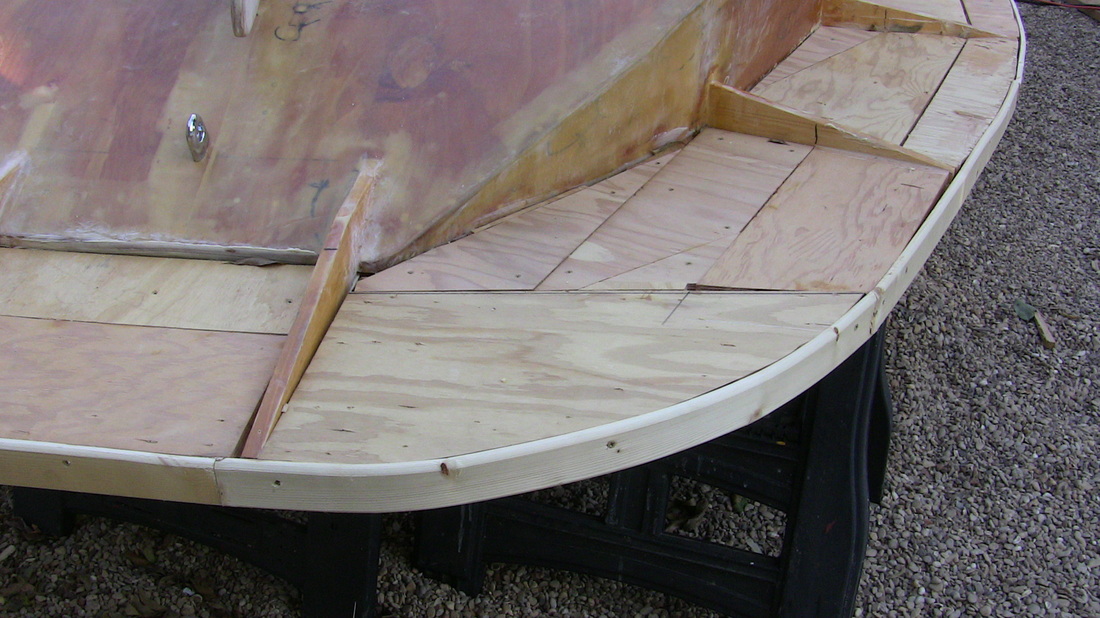
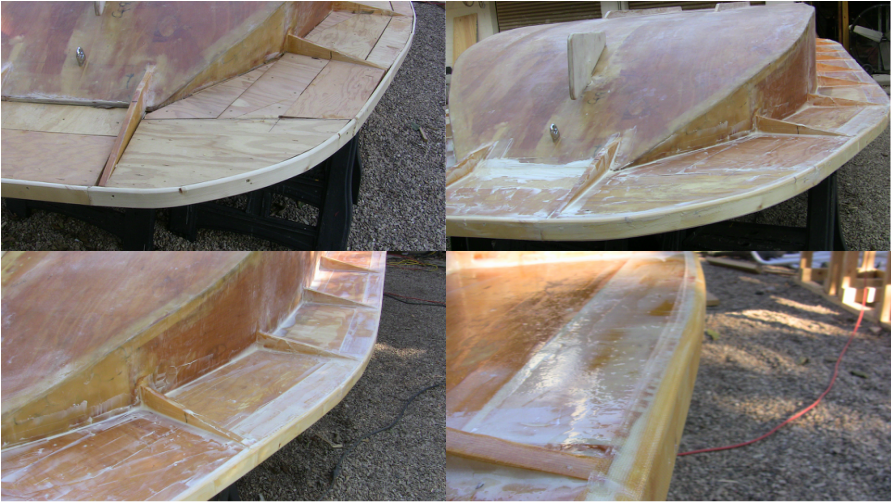
Bulkhead B-1 is in place. Had to trim the bottom to match the boat's bottom angle, and also trimmed the sides to match the curve of the boat's sides. Now need to cut and fit the bow pieces with the deck extension supports. Also need to notch the sides for the mooring posts and their attatched deck extension support.

Getting ready to start cutting the sections for the boat's bottom. I was able to cut a section for the aft side bulkheads S-2 and still have enough to cover the first aft bottom section. I will still need to place the battens. I also am still thinking about installing an underwater window in the boat's bottom. I figure if ever I was going to put one in a boat, a flat bottom boat would be the one to do it in.
Got the bow done. Took a lot of cutting and fitting, but got the main bow pieces done. Was able to nicely glue and screw the end for a lovely bow curve. Had to do a lot of piecing together to allow the two bow deck extention supports to stick through.

Bending the battens for the bow comes next. I did not need to resort to steaming to get them to curve nicely. Next came the splice pieces. I decided place the butt pieces on first and them glue and screw the bottom pieces. Any gaps between the sides and bottom will be filled with the resen putty, before fiberglassing the entire hull.
Here is the under water window frame. I plan on placing a 3/4" plexiglass panel into the opening. First I will route a groove for a rubber gasket on the plexiglass. Then I will screw the panel down for a good seal. Of course the plexiglass goes in after fiberglassing the hull. You can also see the butt pieces I placed for attaching the two foreward pieces together as well as the one for the two aft pieces. Also I placed the butt plates for the center splice for the hull's bottom.
Got a before and after shot. I never could remember to come out while it was dark to trace a shadow, so just resorted to the old method of balancing a stick across the inner two pieces and marking where the stick touched the outer side. The cut may look a little jagged, but that is where the sanding comes in.
Here the starboard(Right Side) bottom piece is getting glued down. Afterwards, I screwed the piece to the tansom, the sides, and the butt pieces. I did not place screws along the batten, nor along the tansom where is crosses the leg that runs down the back. If I had finished running screw across the back leg, then it would be like perferating a page and would have split there when I attempted to bend it to the curve of the boat's bottom. Also make sure to screw flush, and not embed the screws. The screws will hold only the layers that are beneath the head of the screw, not those the screw's head has passed through. Next will come the steaming of the bottom piece.
Steaming the plywood makes it much easier to get nice curves without tearing your wood. I used towels and just poured boiling water over them, slowly tighten the clamps till it is difficult, and then give it a little time to soften before tighting again. Just keep reapeating till you close any gaps.
Depending on how many clamps you have, you may only want to do one side at a time.
Depending on how many clamps you have, you may only want to do one side at a time.
Here the aft end is finally done. I made the bottom a little big to ensure I covered the space. Now I will go back and trim the bottom flush with the sides. Easier to trim down, than find you made the piece too small. I removed the support between the two arms, and sure enough the arms stayed straight without bending out due to the curve of the sides.

Using the same method, we start to bow the foreward piece. We first steamed the piece and after bending it to shape, we let it dry. Then we removed it and placed glue all along all surfaces that would touch the bottom piece. Then we replaced the bottom piece on and began to screw it down. You can also place screws along the battten if you believe it is nessacary, just do not place screws across the piece along the frames, for this will weaken it when you bend the piece.

Bow is pretty much done, just waiting for new piece to dry after steaming. Then I will need to trim it as well. I also plan on routing a curve along the side and bottom joint to make it easier for fiberglass to hold. Fiberglass does not do well on sharp corners.
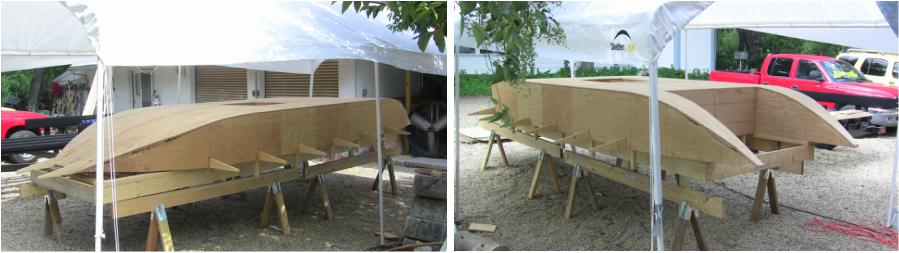
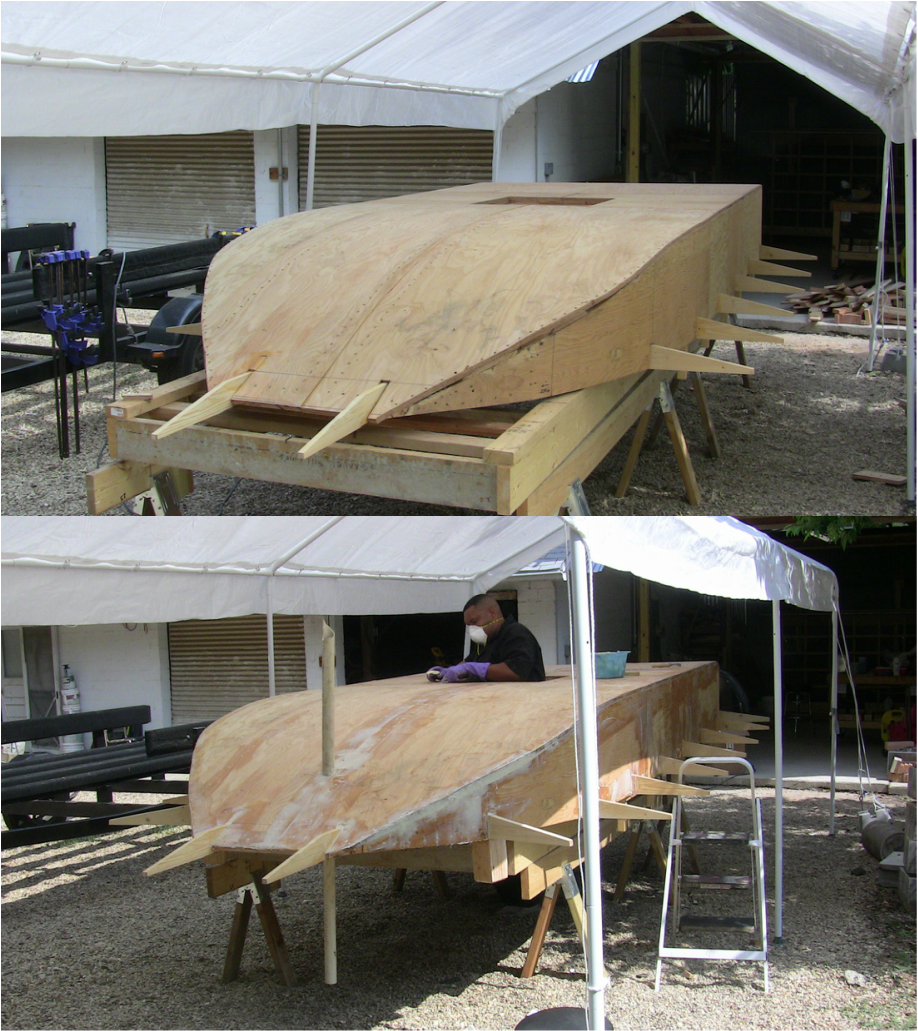
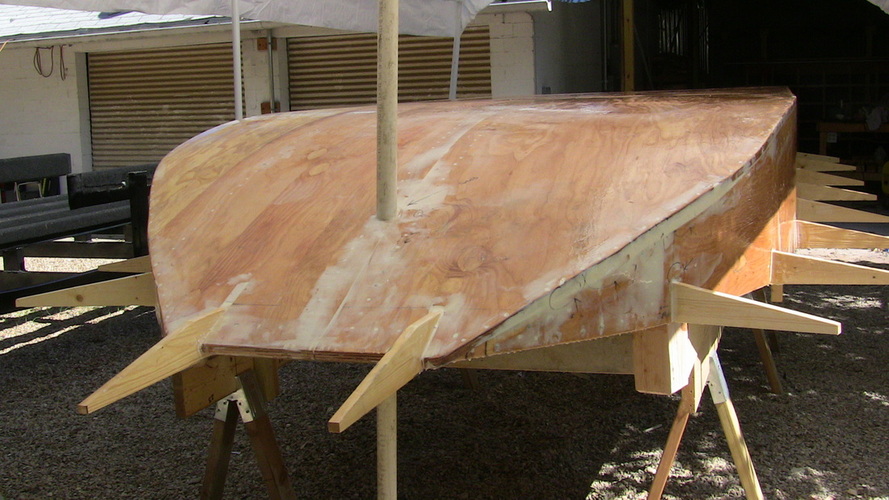
Got the hull more or less done. Decided to go ahead and place the last few deck extension supports on now, before we start to fill in any voids with resin filler. Cut off the excess edge from the bottom flush with the sides, then routed 1/4" round over on all of bottom edges. This will allow the fiberglass to adhere better. Also have to remember to install the rudder tube. Might as well get it sealed around the outside as well.
Third Try is the Charm
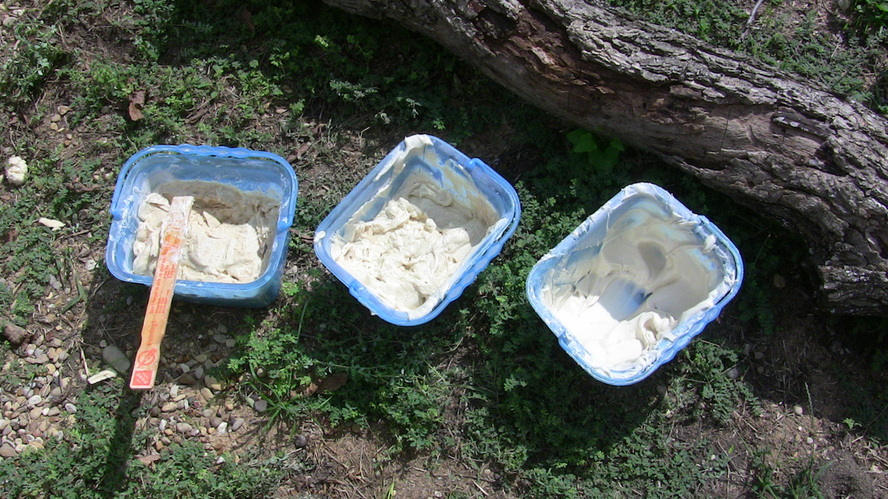
We first wanted to fill in any voids and screw holes, so we are going to make resin filler. This takes mico-spheres as the filler, silica as the thickener (to prevent it from sagging), and the resin and hardener. The ratio of hardener to resin is 1:5, such as 1 cup of hardener to 5 cups of resin. For the micro-spheres and silica, the ratio is 1:1, 1 pound per gallon or 1 oz. per cup. We then mixed the hardener and resin and proceeded to add the filler. Some how my addition was off on the filler so it never thickened. We continued stirring thinking it might eventually thicken when we started to notice steam. Pow! In seconds the entire mixture solidified. Thank God I was not mixing it by hand. Oh by the way, wear a mask due to the vapors, and wear gloves. I would also suggest using lotion on your arms to ensure no splatter sticks. We went over our figures again and found that we were off on the amount of filler. I needed twice as much as we added, that is why it never thickened. So we then mixed the resin and hardener again, then added the correct amount of filler. We got the correct thickness, but by the time we had finish mixing everything thourghly, we had only 5 minutes to use it before it hardened. Ok, once more we tried. This time we decided to add the hardener last. We mixed the resin and filler and only after everything was mixed well did we add the hardener. It worked great. In fact we were able to use the entire batch before it hardened. We also made smaller batches of 2 cups resin, 1 oz microspheres, 1oz silica, and 2/5 cup hardener (2/5 is half way between 1/2 and 1/3 cup.)
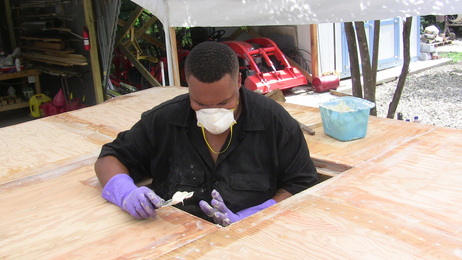
Here is Marcus wearing the face mask to prevent breathing the vapors. He is also sporting a pair of purple gloves (stole them from under the sink, they were my wife's dish washing gloves. She loves purple.) The resin filler is very easy to use and filles voids and imperfections well. After it cures, we will sand then entire area smooth.
We filled in over all the screws, and any gaps between the bottom and sides. Also where there was a bad cut leaving a major gap between the bottom and sides, some carefull application of resin filler does the job. Make sure to fill in any space between spliced boards. We also used the resin filler to smooth the corners around the deck extention supports and the sides.
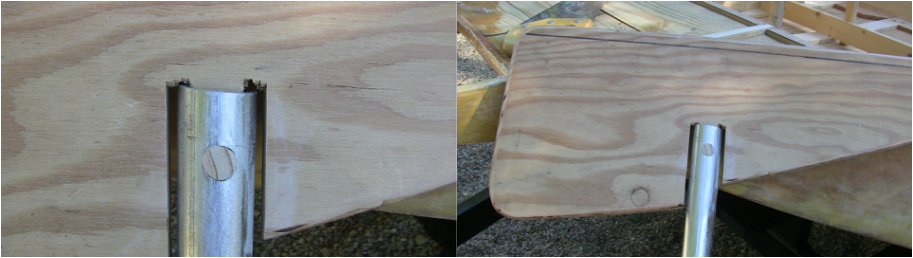
Here is a before and after shot of the bow. We had stuffed some scrap wood into the gap to make it easier for the filler to fill the void. I also had moved the boat foward so I could install the mooring post and their deck extendtion supports. I then shortened aft end of the frame support to be entirely inside the outer edge of the boat. This way when we fiberglass, there will be no danger of the frame support being stuck to the boat. You can also see the rudder guide tube in place. I decided to install this also so we can seal its outside to the boat's bottom. I cut the hole from the inside, close to Frame 1 (Bulkhead 1 - B1) on the cabin side. A few pipe clamps screwed to the Frame 1 inside holds the tube firmly. Make sure the hole is cut at an angle parallel to the Frame 1. I will cut the tube later to its proper size. (Also make sure the rudder pipe is 90 degrees to the boat, mine was just a little off. It still worked fine, but I wish I had made sure it was perfectly straight when I had a chance. I think I may have shifted it when I moved the boat.)

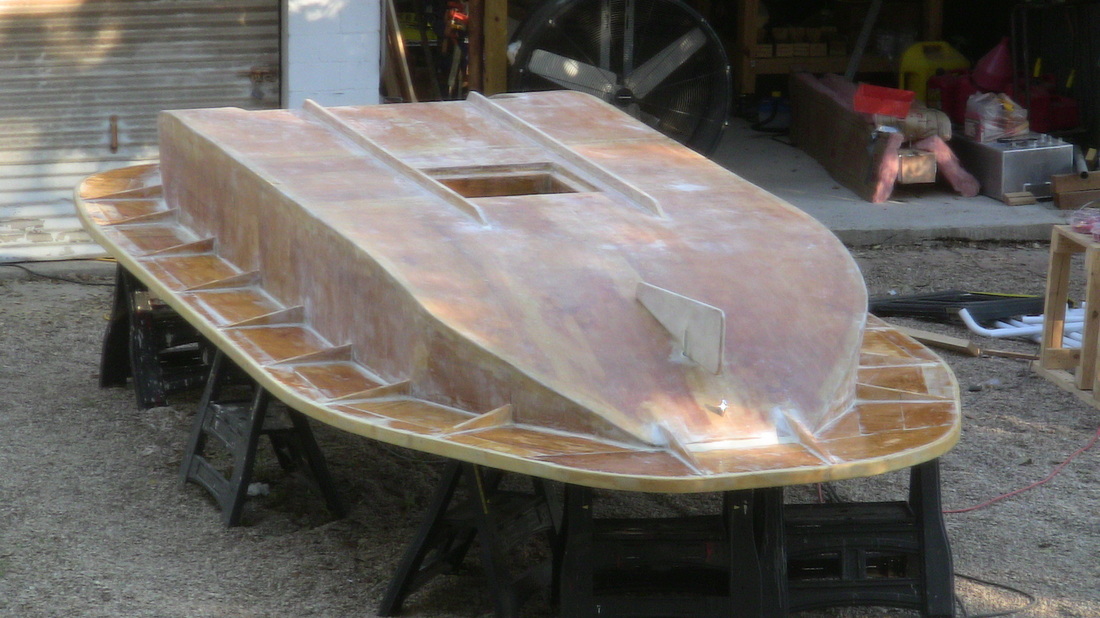
Here is to boat's Hull, all nice and sanded smooth. There are a few places that need a touch up on the filler, but otherwise all the voids are filled.
I read that the first thing in fiberglassing is to give all wood surfaces a thin coat of resin (from here on out when I say resin it means a proper 5:1 resin & hardener mix.) This in essence seals the wood.
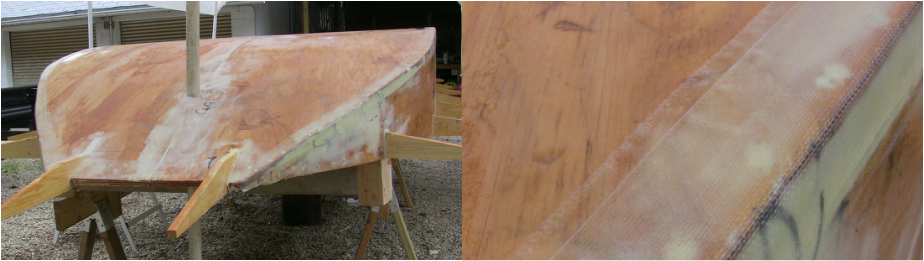
We laid fiberglass tape along the sides. First a 4" strip, then an overlapping 3" strip. This will strengthen all the corners. Make sure to smooth out any bubbles and ripples in the tape. After it dries, I will sand the tape edges smooth before laying the main fiberglass sheets. I did not tape around the deck extension supports. I plan on fiberglassing the underside of the deck, and should take care of this issue then when the deck is in place. Of course this will mean flipping the boat to place on the deck and then reflipping it so I can then fiberglass the deck's underside.

We laid a fiberglass sheet on top and drapped it over at least 2" onto the side. Here is Marcus , it has dried, sanding the drapped edge smooth to prevent any air pockets when we lay the side fiberglass sheets. Fiberglass dust is a lot more irritating than resin dust, so definatley wear protection here..
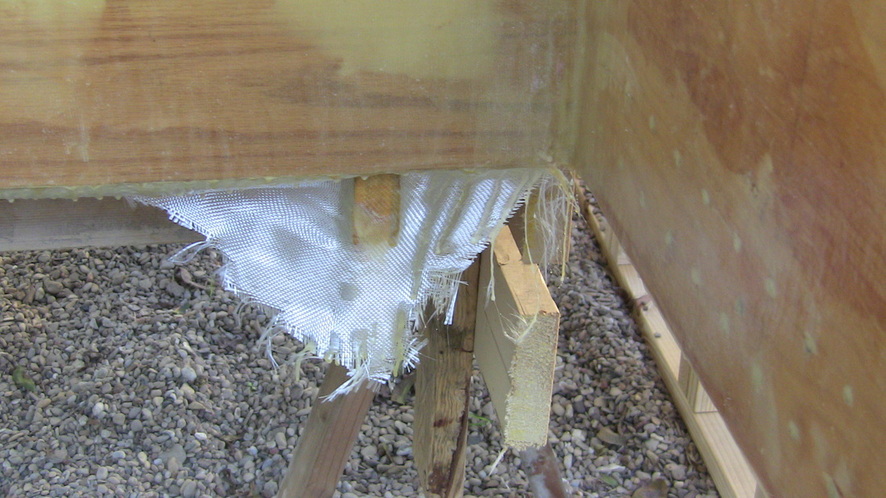
Make sure to trim the fiberglass sheets after you lay them, but before they completely harden. I would wait till the resin has begun to harden for the easiest cutting. A good box cutter or a pair of scissors can be used.

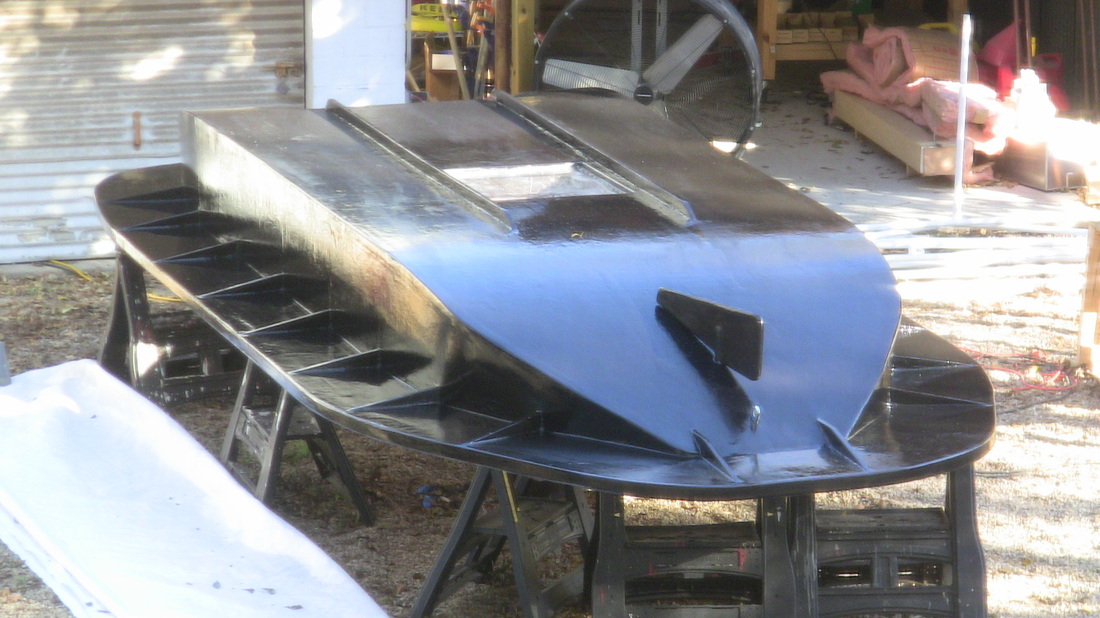
Here the boat has been completely sheathed in fiberglass. Now we just need to place at least two coats of resin. You will not need as much resin for a coat as you used to lay a sheet of fiberglass. I also has Marcus install the two bilge keels on top. I had him measure the center distance from the outter gaps of the trailer. I wanted to make sure the boat would glide onto the trailer without any trouble.

In preperation for eventually turning the boat over, I designed a support bench. It has gaps that the deck supports can swing between, placing all the weight onto the sides. We will remove the tent canopy, since it is cooler and it is really not needed anymore.

Before we turn the boat over, I wanted to test fit the rudder. I needed to tweek it a little to make sure it had the proper clearance between rudder and boat bottom when the rudder turned. I just notched the rudder and placed on it. I drilled a hole through the rudder pole and secured it to the rudder with a dowl. I then sanded the dowl smooth and flush. I will then fill the ends and fair the pole into the rudder using resin puddy. I plan to then sheath the rudder in fiberglass.

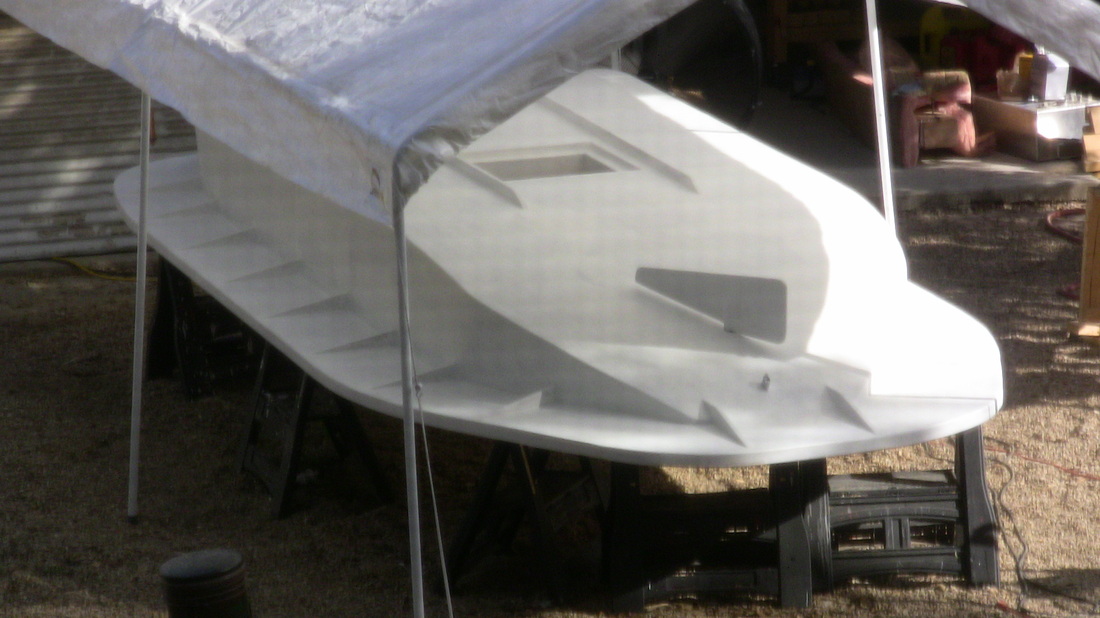
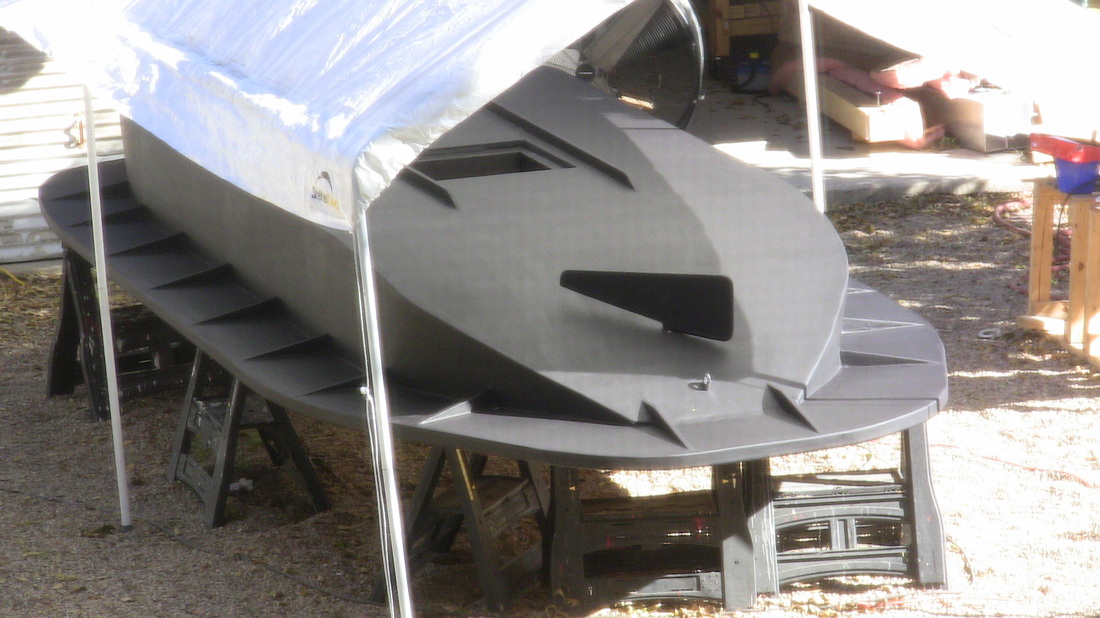
Here is the boat, all sanded and ready to be turned over. I am not painting at this time. After the deck has been placed on, I will turn the boat back onto its back and fiberglass the deck to the deck supports. I will then paint and also affix the underwater window.
The Righting of the Boat

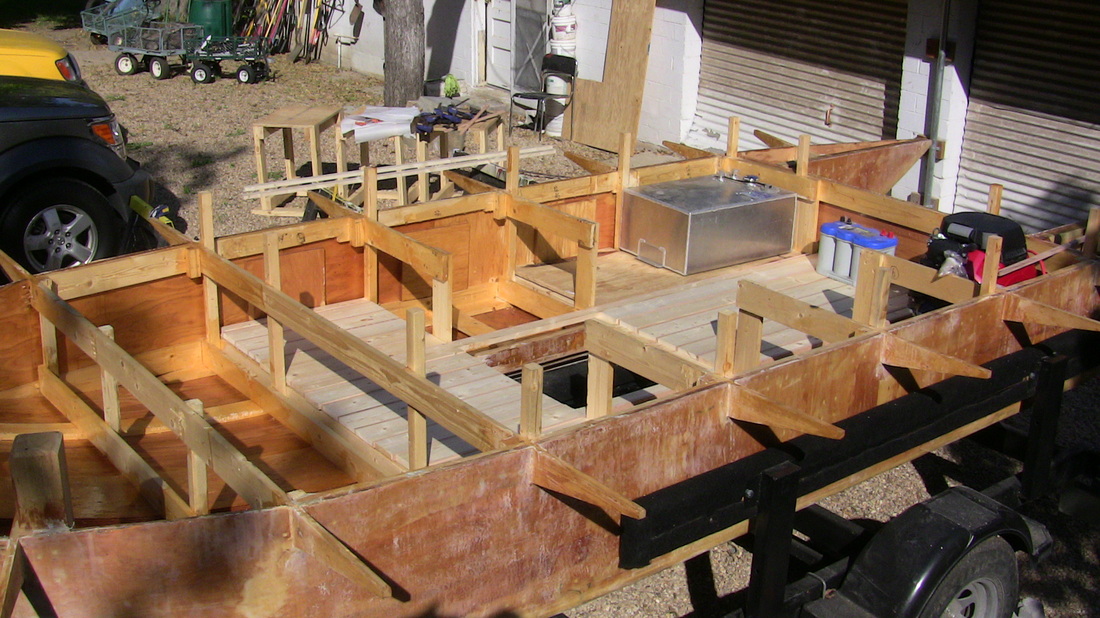
I am test fitting the inner deck. I am also testing the placement of the gas tank, battery, and engine. I am placing a 1/2 inch plywood sub flooring down. The deck will consist of 1x4 in white wood, with a 1/4 inch red oak strip for looks. I am goping to coat the entire inner hull with resin, including both sides of the subfloor. The floor will be sheathed in 4 oz fiberglass, which is supposed to be nearly transparent. I plan to place the battery in the center for ease of reaching and also to help balance the boat.

The gas tank is an aluminum tank with a capacity of 18 gallens. I plan to make a 1/2 inch plywood box to surround the gas tank and fiberglass the interior. This will ensure no gas leaks into the water or into the boat. I will also be installing a blower to remove any gas fumes prior to starting the engine.

For the engine base, I made a floor of 2x4s. THis should have enough strength to support the engine. The engine will be mounted with lag bolts. I will also have a blower for the engine as well. You can see the clutch already installed on the engine. I believe it will engage at around 2000 rpm. The engine is a 22 hp Honda side mount.

Gas tank box built. I used fiberglass tape in the corners and sealed it all in resin.
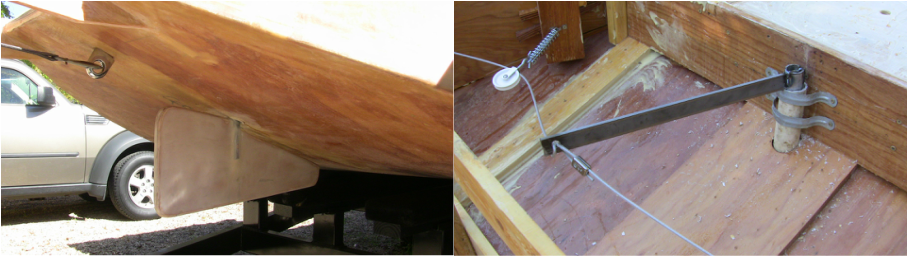
Rudder is installed. I had to place the rudder and the steering linkage in before I could place the deck on. I made resin puddy to fair out the rudder stem to the rudder blade, then sanded it all smooth. The rudder arm is below the top of the upper frame so it can swing freely. I welded the rudder arm by cutting a slot in the stem. I set the pulleys so that I got a good turn radius on the rudder of about 45 degrees. I do not want the rudder to be able to turn sideways if it hit a sandy bank and therefore strand the boat.
Installed 3/4" marine plywood subfloor for outter deck (was going to use 1/2" but 3/4" was on sale.). I also placed a 3" edge piece under the subfloor to help splice the sheets together. The edge piece will also allow me to place a nice edge trim along the outter edge. Now I am ready to turn the boat over once more to fiberglass the underside of the outter deck without messing up my nice trailer. This will also allow me to paint the hull and install the underwater window.

Boat back on its back. Was not as pretty as first time, but nobody hurt, and nothing broke, Pivot bench did not work since arms were not able to freely swing since deck was installed. Yea! Hmmm. After looking a the 3" subfloor edge piece we put on. I decided it would look better if we filled in the entire under side. It was like building a puzzle, but I did it. I believe it looks much better.

Here is a close up of the puzzle. Now I think I would like to make the boat look more finished by placing a edge piece all along the outter edge. I will round it over with a 1/4" router bit. I will place it on before I fill in the voids with resin puddy. I figure the egde piece itself will cause some gaps.
It looks nice. I made it 2 1/4" wide so the decking planks will be flush with its top edge. Now to bend it along the hull's outter curves.
Argggg! That is twice it broke. It is too cold to use the hot towel method. Going to pony on up and buy a steam kit.

Bought the steam kit. Had to make my own steam box. Figured will make planks about 5'1/2" long so made box 6"x6"x6'. Need to heat wood about 200 degrees, and rule is one hour for every 1" thick of wood. So figure one hour would do.
Bought steam kit from Rockler. Kit came with the steam generator and hose, fittings for back of steam box, and hinge and door hardware for lid.
When the wood is heated, it sure bends more easily. I first tried to use clamps, but finally just screwed trim on as I went, and got nice curves.
Bought steam kit from Rockler. Kit came with the steam generator and hose, fittings for back of steam box, and hinge and door hardware for lid.
When the wood is heated, it sure bends more easily. I first tried to use clamps, but finally just screwed trim on as I went, and got nice curves.
3/4" thick trim piece still broke. Made trim piece 1/2" thick and had better results. Descovered that if I had used wood with less knots, then would have bent without breaking. I figure I will go ahead and use resin putty to filling any voids on outter trim pieces. Then use fiberglass tape to strengthen it and then paint same color as hull to hide putty.

Trim looks nice. Can't wait to start filling in with the resin putty.
Before and After shots. Wood panel fill in, Resin putty fill, Sanding the putty smooth, Placing two layers of fiber tape on edge. I am still thinking about placing fiberglass tape along inner edge of hull and underside of deck. Then laying a sheet of fiberglass on underside of the deck.

Sanded the fiberglass tape on the edge and laid tape along the inner corner of the deck and hull. Next step will be to sand this tape and then lay sections of sheet fiberglass between the deck supports onto the under deck wrapping around the edge piece.

Painted on two coats of primer. Had to wait 4 hours between coats to ensure primer cured. Put tent up again to prevent the leaves from sticking in the paint.
My wife said, "It now looks like a boat."
My wife said, "It now looks like a boat."
2nd coat of Black Hull paint applied. Next is making a rubber
gasket for the underwater window, and drilling the screw holes in the 3/4"
plexiglass.
gasket for the underwater window, and drilling the screw holes in the 3/4"
plexiglass.
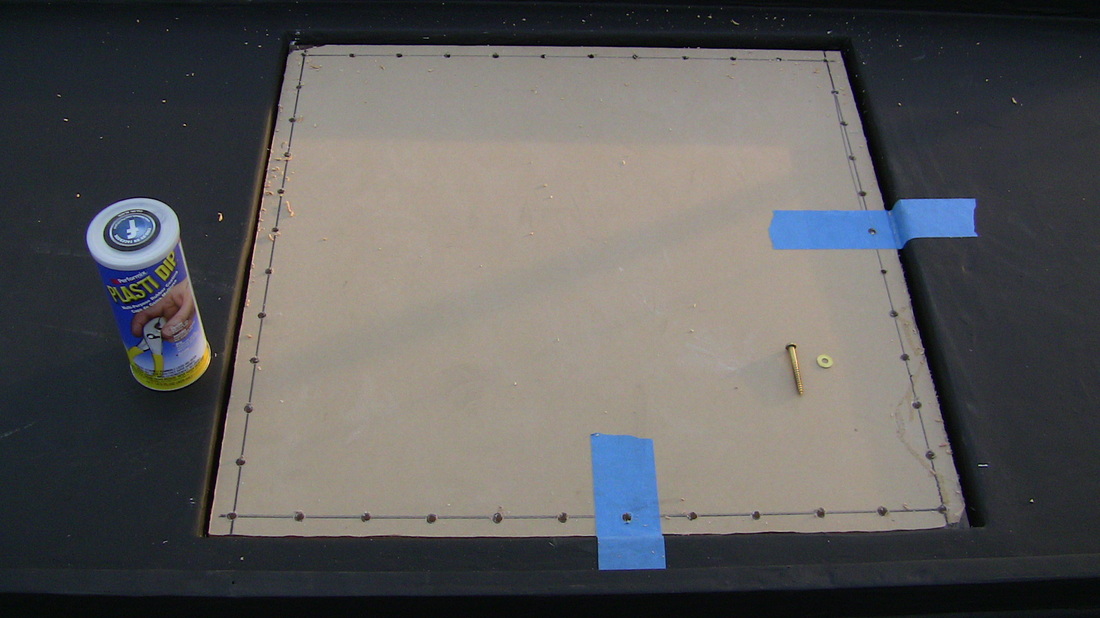
First I bought 50 brass #12x2" round head wood screws and #12 large brass washers. I wanted the screws to not corrode in water, so I went brass. I then drilled 15/64" holes in the plexiglass 2" apart all around the edge about 3/4" in. The window ledge is 1 1/2", so figured that give me a good seal. Then I placed the plexiglass into the window ledge and placed painters tape to help align it back after I remove the plexiglass to pour the rubber
seal. I then used a 9/64" drill bit to make pilot holes in the ledge. Hmm. Plastic dip sucks for making gaskets. Going to clean mess and use a rubber tube as seal.
seal. I then used a 9/64" drill bit to make pilot holes in the ledge. Hmm. Plastic dip sucks for making gaskets. Going to clean mess and use a rubber tube as seal.
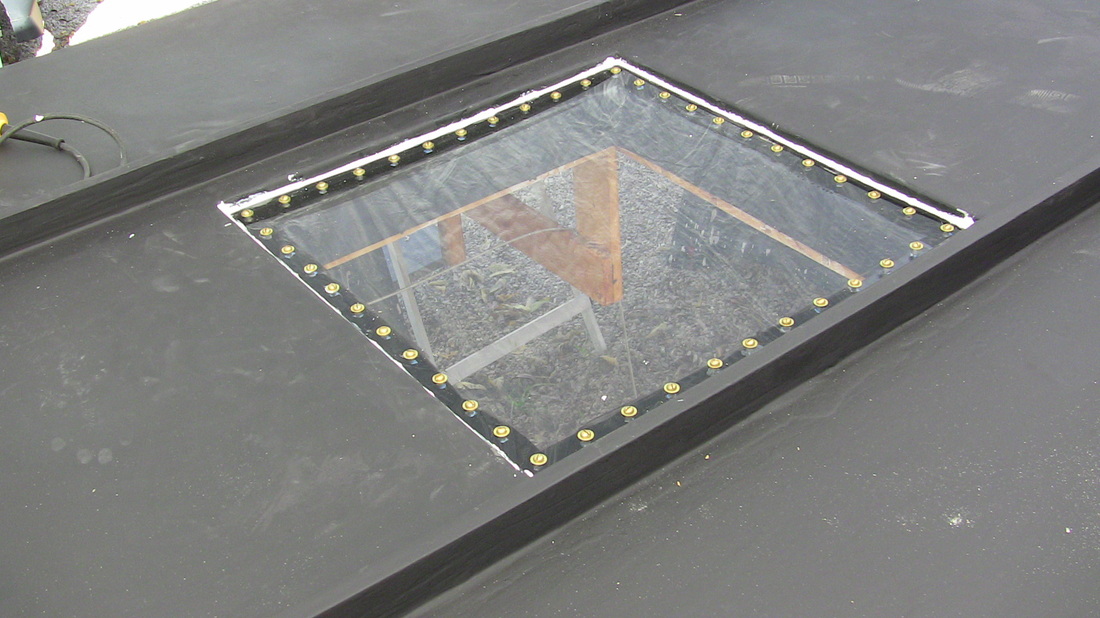
Used foam board instead. Cut it to make a perfect gasket. Then predrilled holes through it and screwed it down. Tested it with water and mno leaks.
Last coat of resin drying. Boat nice and shiny. Underwater windo
installed and tested. Junst waiting to flip it tomorrow and set it on the
trailer.
installed and tested. Junst waiting to flip it tomorrow and set it on the
trailer.
Finally upright and on trailer. Placed engine and gas tank in (not permantely installed yet.) Now need to work on paddlewheel.